If you’ve been following the launch of the Samsung Galaxy S7 / S7 Edge, you may have read that adoptable storage, a Marshmallow feature that lets you use the microSD card just like internal storage, is missing. The S7s do include a feature where you can move apps to SD card, but it’s not quite the same. The good news? You can enable the feature using ADB and it seems to work great, including in hybrid (‘mixed’) mode. This feature easily allows to move apps to sd card while you have had converted your microSD card into adaptable storage.
In order to set adoptable storage up, you will need a computer with working ‘adb’ and, of course, a microSD card in your phone, the faster the better (I personally use a 200GB SanDisk MicroSD Card in my own device. Here’s the process!
How To Merge / Combine MicroSD Card Storage With Internal Storage on Galaxy S7 & Edge With Adaptable Storage Mode?
1. BACK UP THE DATA YOU HAVE ON YOUR MICROSD CARD. Your card will be formatted by this process, so make sure you have saved any pictures, videos etc. from your card to your PC before you start. Make sure you have installed Drivers of Samsung Galaxy S7 & Edge on your Windows PC (Windows Vista, 7, 8 and 10).
2. Decide how you want to split your card. You can either commit 100% of the card to internal storage, or split between internal storage and conventional SD. This option is useful if you like to unplug your card and put it in your PC. I would probably recommend committing the whole card.
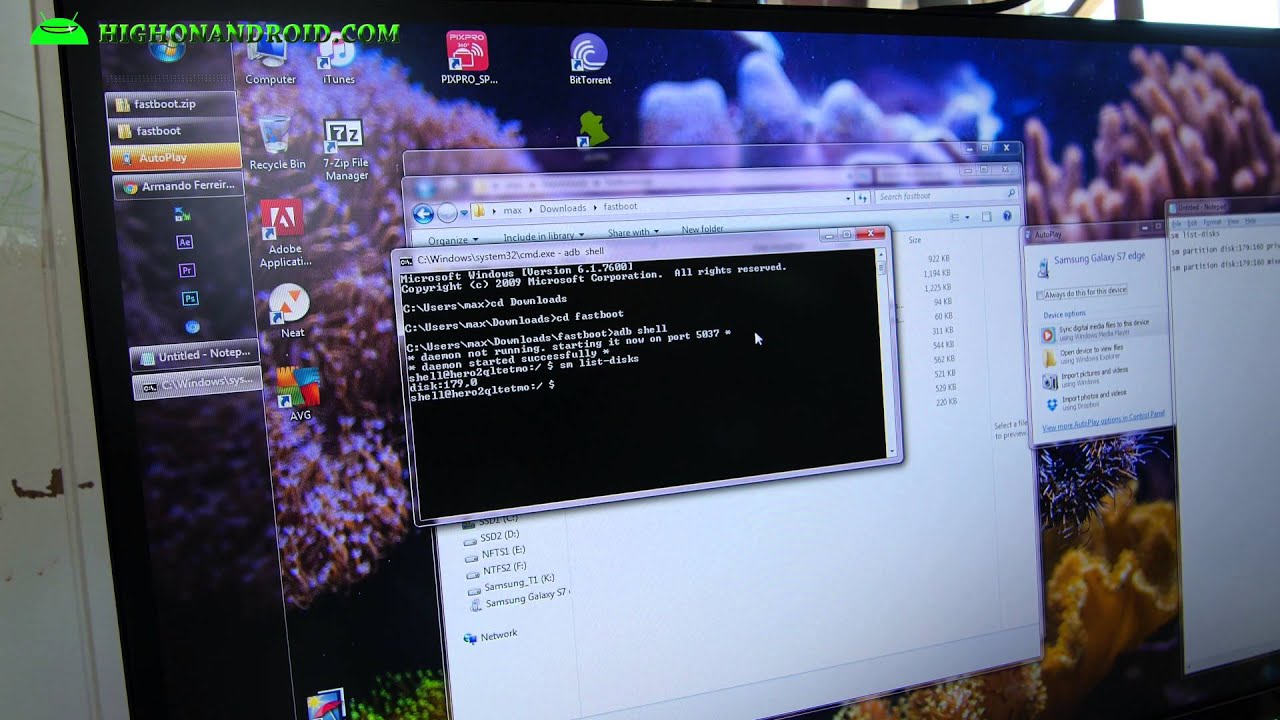
3. Open your command window / terminal on your computer and type the ‘adb shell‘ command (with your phone connected of course). You will need to enable USB debugging in developer settings (which in turn is displayed by tapping the build number of the device 5 times) in order to see the option.
4. Type ‘sm list-disks‘ to list the disks available for adoption. It’ll look something like below – take note of the disk ID (disk:179:160 in this example).

5. Partition the disk. For this we use the ‘sm partition DISK TYPE RATIO’ command. For example, to partition the disk above as fully adopted storage (aka private) I’d use the command ‘sm partition disk:179:160 private‘. If I wanted a 50/50 split between adopted and regular, I’d use the command ‘sm partition disk:179:160 mixed 50‘. Easy right?
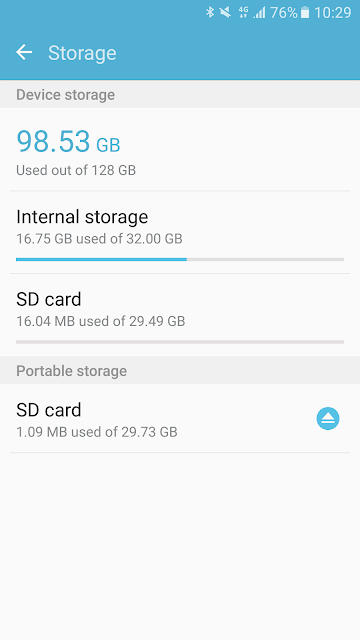
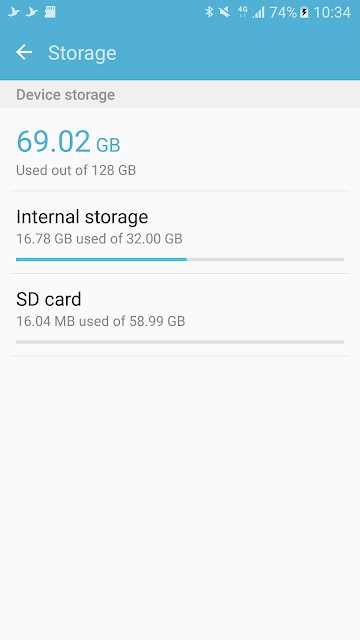
6. This process will take a while, but when it’s done, the Settings -> Additional Settings -> Storage view on your device should show the new Internal Storage. Note that, for some reason, the total space isn’t reported correctly as you can see in this image, however everything seems to work OK. When you install apps, they will generally install automatically to the storage with the most space available, although you can manually move things around if you want to, perhaps for performance reasons (the real Internal storage will likely always be a bit faster).
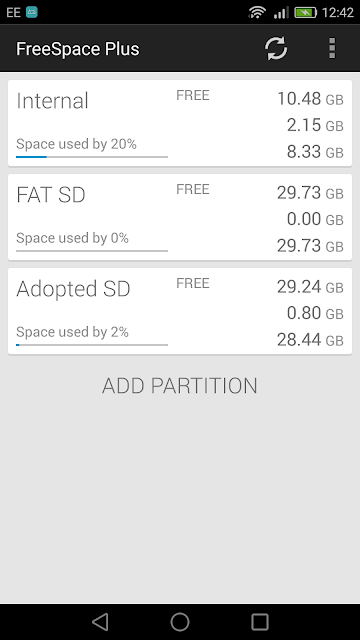
7. If you want to see another view of how you are doing for space, you can use a third party tool such as FreeSpace or FreeSpace Plus.
And that’s it! Let us know how you get on, and enjoy your new, expanded Galaxy S7 or Galaxy S7 Edge!

- Top 10 Best Samsung Galaxy S23 Camera Apps - September 5, 2023
- Download 4D Parallax Wallpapers App Galaxy 24 Ultra - September 5, 2023
- How to Delete or Deactivate Instagram Account Permanently? - September 5, 2023